
Really Awesome New Cisco confIg Differ (RANCID) can automatically archive backup copies of your Cisco configuration (config) files to a Concurrent Versions System (CVS) repository, detect updates and backup config file versions to CVS, and notify you of individual command changes via email. These functions make RANCID an important tool for disaster recovery; it is used at AOL, Global Crossing, and many other corporations. RANCID can also manage network devices from HP, Juniper, Foundry, Alteon, and others, but managing those devices is not covered.
These instructions assume a basic knowledge of Cisco switches and routers, the Unix command line (terminal) window, and basic text editing.
In this section we install general prerequisites including the Postfix Simple Mail Transport Protocol (SMTP) email server to deliver RANCID notifications.
You may install the MacPorts package manager with these instructions. Follow the instructions carefully and perform all non-optional steps.
In this section we’ll install and use the Postfix SMTP server using MacPorts. You may also use a commercial SMTP server that supports Sendmail emulation, such as: Communigate Pro, Post.Office, or SurgeMail (see vendor documentation for installation instructions.)
%%sudo port install postfix
Use the sample Postfix configuration files.
%%cd /opt/local/etc/postfix%%sudo cp master.cf.sample master.cf%%sudo cp main.cf.sample main.cf%%sudo cp aliases.sample aliases
Run these commands to activate the Postfix aliases file.
%%sudo postalias /opt/local/etc/postfix/aliases%%sudo newaliases
Redirect OS X’s Sendmail executable to the one from MacPorts.
%%sudo mv /usr/sbin/sendmail /usr/sbin/sendmail.old%%sudo ln -s /opt/local/sbin/sendmail /usr/sbin/sendmail
Start Postfix and set it to run at system boot.
%%sudolaunchctl load -w /Library/LaunchDaemons/org.macports.postfix.plist
Finally, test the SMTP server by sending a sample message.
%%mail joe@exp.com
Enter text for the message body and then press Control-D on a blank line to send the message. This test must succeed for RANCID email notifications to be delivered. Make sure the SMTP server for the receiving domain will allow mail from your RANCID workstation. If the email does not arrive, check the mail log to see why as shown.
%%tail /var/log/mail.log
The default Apache user and group for OS X is “www”. You may run RANCID as user “www,” or you may create a new user for RANCID in the Accounts pane of your Mac's System Preferences and set Apache to run as that user. As long as you run RANCID as the same user as the Apache user, RANCID web access will work fine.
Install and configure cvsweb.
%%sudo port install cvswebEdit the cvsweb.conf file.
%%sudo pico /etc/httpd/cvsweb.confChange the @CVSrepositories 'local' variable to point to the path to your RANCID CVS repository as shown.
@CVSrepositories = (
‘local'      =>  ['Local Repository',   '/opt/local/var/rancid/CVS'],
# 'freebsd'  =>  ['FreeBSD',            '/var/ncvs'],
# 'openbsd'  =>  ['OpenBSD',            '/var/ncvs'],
# 'netbsd'   =>  ['NetBSD',             '/var/ncvs'],
# 'ruby'     =>  ['Ruby',               '/var/anoncvs/ruby'],
);
Backup and edit the
httpd.conffile.%%cd /etc/httpd%%sudo cp httpd.conf httpd.conf.orgSet the Apache user and group to the user you choose to run RANCID. If you chose to run RANCID as the default user and group “www," no changes need to be made.
User <nrg-user>
Group <nrg-group>
To provide a shortened RANCID url for cvsweb.cgi, place a redirect statement in the httpd.conf file redirect section following this example:
#
# Redirect allows you to tell clients about documents which
# used to exist in your server's namespace, but do not
# anymore. This allows you to tell the clients where to look
# for the relocated document.  Format: Redirect old-URI new-URL
#
Redirect /rancid http://rancid.mycompany.com/cgi-bin/cvsweb.cgi
#
Start Apple's Apache web server by turning on Personal Web Sharing in your Mac's System Preferences, or turn it off and on to restart it.
In this section we install and configure RANCID and CVS to monitor and store Cisco configs.
Perform the following MacPorts command in a terminal window to install RANCID.
%%sudo port install rancid
This file contains the list of TCP/IP addresses (or DNS names), usernames, and passwords to login to every RANCID monitored device and must reside in the RANCID user’s home directory. Copy the sample file into place and set permissions as shown.
%%cp /opt/local/share/rancid/cloginrc.sample ~/.cloginrc%%sudo chmod 640 .cloginrc%%sudo chown –R <rancid-user> ~/.cloginrc
Now edit the file.
%%sudo pico ~/.cloginrc
To access your devices via telnet, add an entry for each device you want RANCID to monitor in the form:
add password <TCP/IP address> <telnetpasswd>
      <enablepasswd>
Here is an example .cloginrc for two
devices.
add password 64.208.45.10 golf lager
add password 64.208.45.12 swatch trophy
To access your devices more securely via secure telnet (SSH), use the same entry as for telnet access, omit <enablepasswd> and add a line for the username as shown.
add user 64.208.50.10 joe
add password 64.208.50.10 secret45

add user 64.208.50.12 william
add password 64.208.50.12 golf
If your devices do not require an enable password (they are
auto-enabled), you will need to add the autoenable command to
.cloginrc in this form.
add autoenable <ip-address> 1
Keep in mind that wildcards are permitted with all commands. For example if all your devices are auto-enabled, you may use a single entry.
add autoenable * 1
If you use Cisco’s tacacs+ to provide common usernames and passwords across all your devices, wildcards and DNS names may be used very effectively so you don't need to modify the .cloginrc when you add multiple devices with the same authentication methods.
add autoenable *-ssl.mycompany.com 1
add user *-ssl.mycompany.com ranciduser
add password *-ssl.mycompany.com walrus
See the cloginrc man page for more details.
%%man cloginrc
Device groups are simply user-defined categories for your network
devices that you define in the rancid.conf variable
named LIST_OF_GROUPS. Device groups should be planned
with care because how you categorize devices affects characteristics of
RANCID's operation. You should use multiple device groups if you want to
do any of the following:
Organize the config file repository visually by device category, location, or any other organizing method. See the screenshots in View RANCID CVS Webpage for an example layout.
Send notifications selectively among multiple support teams or persons on a support team by grouping devices according to the support team or person(s) responsible. See Setup RANCID Email Aliases for details.
Check subsets of devices at a different time intervals than the rest. See Start and Test RANCID for details.
Edit the rancid.conf and define the
LIST_OF_GROUPS variable according to the device
groups you've chosen as shown.
%%cd /opt/local/etc/rancid%%sudo pico rancid.conf
Enter any descriptive name you wish for your device group(s). For multiple device groups use a space as a separator. Here are two hypothetical entries:
LIST_OF_GROUPS="routers"
LIST_OF_GROUPS="coreswitches edgeswitches routers"
You may also wish to set the OLDTIME variable
to set the number of hours beyond which RANCID notifies you of
unreachable devices. The value you set should be greater than or equal
to the frequency RANCID is set to check your devices (see section Set cron to run RANCID). Set the
variable following this form.
OLDTIME=<# of hours>; export OLDTIME
The rest of the rancid.conf variable are usually fine at the default settings for most purposes.
After RANCID has been configured the CVS repository may be
installed. The structure of the CVS repository is determined by the
rancid.conf variable named
LIST_OF_GROUPS variable, which you set according to
your needs as shown in the previous step. To install CVS and populate
the device groups, follow the steps below.
%%sudo -u <rancid-user> rancid-cvs
The
rancid-cvs command makes a directory corresponding to
each device group in the path:
/opt/local/var/rancid and places a
router.db file within it.
%%cd /opt/local/var/rancid/<groupname>%%pico router.db
Edit
the router.db file for each corresponding group and
place a list of the group’s devices within the file. For example,
"LIST_OF_GROUPS=coreswitches routers" would create a
router.db file in
./rancid/coreswitches/ and
./rancid/routers/. Type an entry for each device in
the form “device:mfg:state” where mfg is “cisco” for devices running
IOS, and “cat5” for CatOS as shown.
64.209.45.10:cisco:up
64.209.45.11:cat5:up
Here is a file with two devices listed by DNS name.
switch22.widget.com:cat5:up
switch99.widget.com:cisco:up
Finally, set the permissions of all CVS files to the user under which you intend to execute RANCID, and also set the history file for world access.
%%sudo chown -R <rancid-user>:<rancid-group> /opt/local/var/rancid/*%%sudo chmod 666 opt/local/var/rancid/CVS/CVSROOT/history
To add additional groups to the RANCID CVS repository, just add
your groups to the rancid.conf variable
LIST_OF_GROUPS and rerun the
rancid-cvs command as shown above. Your existing
groups will not be overwritten. You may remove groups from RANCID the
same way, but the directories are not removed from CVS. They can be
removed manually but you must be very careful to delete only the
directories you don't want or CVS will be damaged.
In this section we set email aliases to direct RANCID email notifications to the appropriate network support personnel. RANCID email aliases are specified for each device group, so take your personnel notification needs into account when choosing a device group strategy.
An email alias (also called a forwarder) is an email server object associated with an address that cannot store messages but forwards them to another address. We create two aliases for each device group following this pattern:
rancid-<groupname>
rancid-admin-<groupname>
Note
If you chose to use a commercial SMTP server, consult the vendor instructions for creating aliases.
Open the Postfix aliases file in a text editor.
%%sudo pico /opt/local/etc/postfix/aliases
Insert aliases for each RANCID group as shown in this section of this example aliases file.
# Put your local aliases here.

rancid-coreswitches:         joe@yahoo.com
rancid-admin-coreswitches    joe@yahoo.com
rancid-edgeswitches:         sue@yahoo.com
rancid-admin-edgeswitches:   sue@yahoo.com
Make sure the suffix of each alias precisely matches the group names listed in the LIST_OF_GROUPS variable in the rancid.conf file. Set each alias to forward to the email address of the appropriate support person.
In this section we run RANCID manually to test the installation and check for the presence of retrieved Cisco config files in CVS from a terminal window. In the next section, we’ll view config files from a web browser.
RANCID “diffs” (compares) the copy of the config file in the device with the corresponding copy stored in the CVS repository. If the copies aren’t identical, RANCID adds the newer version to CVS. To check all your device groups, first make sure you are logged in as the user with which you intend to run RANCID, then use the command:
%%sudo -u <rancid-user> rancid-run
%%sudo -u <rancid-user> rancid-run <groupname>
Check your email account for notification messages. If you do not receive notifications, check to make sure the alias suffixes and device group names match. You may check the log files for detailed troubleshooting information as shown in the next section.
After the rancid-run program has completed, the CVS directory for each device group contains a config file for each device. To check, follow this example.
%%cd /opt/local/var/rancid/<groupname>/configs%%ls%%cat <device-filename>
Check the log file directory
(/opt/local/var/rancid/logs) to see if there are
any errors. A log file is created for each group every time RANCID runs.
Make sure your .cloginrc file has the correct
telnet and enable passwords if a login fails. Refer to the “Test the log
on” section of Getting RANCID on
FreeBSD for information about troubleshooting login
failures.
A program is scheduled to run periodically via cron by placing commands in a file named “crontab.” There is a crontab file for each Unix user so you must be sure to edit the crontab file of the OS X user that runs RANCID. For example, you may use this command:
%%sudo -u <rancid-user> crontab -e
If you set the EDITOR shell variable during the MacPorts install, the editor of your choice will open the crontab file. If you didn’t set this variable you may want to set it now because the default editor is a somewhat arcane editor called vi, which can be difficult for the uninitiated. Add the lines shown to the RANCID user's crontab.
# run config differ every day at 3:00 AM
0 3 * * * /opt/local/bin/rancid-run

# clean out config differ logs (+n keeps n days, so 2 here)
0 3 * * * /usr/bin/find /opt/local/var/rancid/logs -type f -mtime +2 -exec rm {} \;
If you are using multiple device groups, you may schedule RANCID to check groups at a separate intervals. Review the section Check individual groups above for how to check a device group individually and make your crontab entries accordingly.
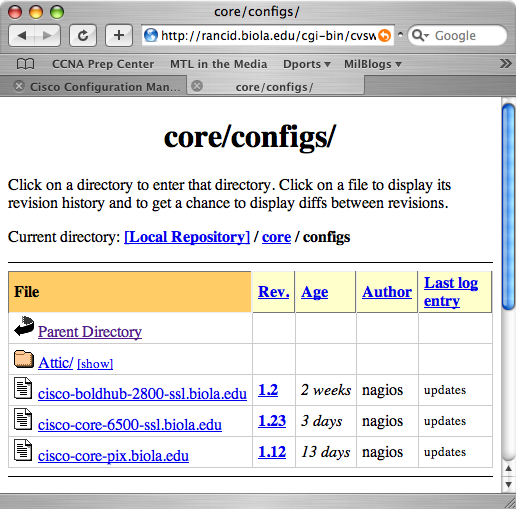
You may open your web browser and go to http://localhost/rancid to view your Cisco configs. The config files are organized according to device groups as shown in the figure below.
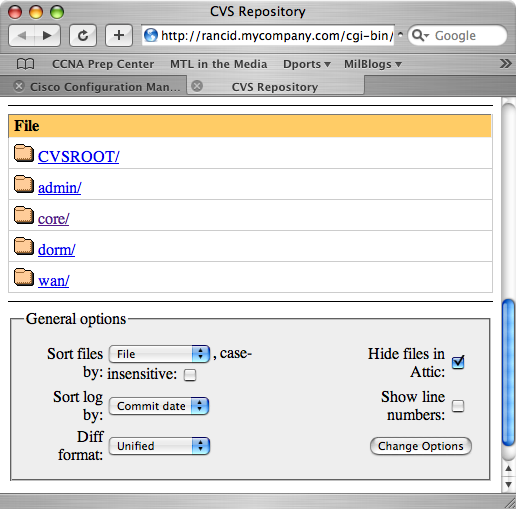
Click on a group to view the config files archive of any devices in the group.
If your config files are not stored in CVS after the rancid-run command has completed, see View config and log files to try to determine the cause of the problem.
If you need further assistance with RANCID you should carefully
check the file in /opt/local/var/rancid/README to see
if it answers your questions. Also check the FAQ and/or join the
RANCID mailing list by visiting the RANCID home page, or search
the RANCID
mailing list archives.